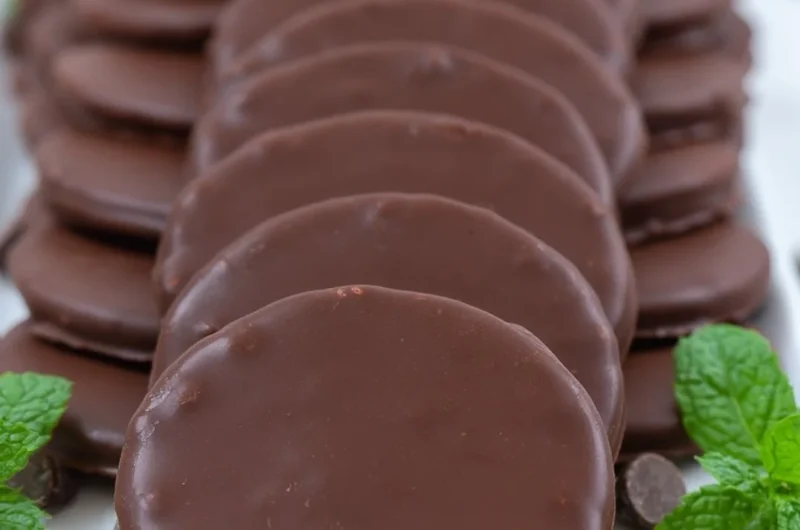
Homemade Thin Mints: A Cozy Treat for Every Occasion
As the leaves begin to turn and a crisp chill fills the air, there’s something about homemade cookies that brings warmth to the heart and sweetness to the soul. The moment you catch a whiff of freshly baked treats wafting through the home, nostalgia wraps around you like a cozy blanket. These Homemade Thin Mints are not just any cookies; they’re a delightful spin on a classic favorite, perfect for sharing with friends and family during the Holidays.
Imagine biting into a tender, chocolatey cookie infused with a refreshing peppermint flavor, dipped in luscious chocolate. They’re rich, they’re satisfying, and they’ll transport you right back to childhood memories with every bite. This easy recipe is one you’ll definitely want to pin for later!
Why You’ll Love This Recipe
- Irresistibly Delicious: The combination of creamy chocolate and zesty peppermint makes for an indulgent treat sure to satisfy any sweet craving.
- Perfect for Sharing: These cookies are a crowd-pleaser, ideal for parties, gatherings, or simply a cozy night in.
- Easy to Make: With straightforward ingredients and simple steps, you’ll whip up these cookies in no time.
- Customizable: Add your own flair with different toppings and flavors to create your unique spin.
- Holiday-Ready: Whether you’re baking for a festive celebration or a cozy evening, these cookies fit right in.
Ingredients You’ll Need for Homemade Thin Mints
Before we dive into the baking adventure, let’s gather these simple ingredients:
- 1 cup unsalted butter, softened
- 1 cup granulated sugar
- 1 tsp peppermint extract
- 2 cups all-purpose flour
- 1/2 cup unsweetened cocoa powder
- 1/2 tsp baking powder
- 1/4 cup milk
- 1 cup semi-sweet chocolate chips
- 1 tsp vegetable oil
Step-by-Step Instructions
Let’s make it together! Follow these cozy steps to create your own batch of Homemade Thin Mints:
- In a bowl, cream together the butter and sugar until smooth. Stir in the peppermint extract, letting those enchanting scents fill your kitchen.
- In another bowl, mix the flour, cocoa powder, and baking powder. Gradually add this dry mixture to the creamed base alternately with the milk, mixing until all ingredients are well blended.
- Roll the dough into a log, wrap it in plastic, and chill for at least 1 hour. This step is crucial; it makes slicing easier and enhances the cookie’s flavor.
- Preheat the oven to 350°F (175°C) and line your baking sheets with parchment paper, a handy trick for easy cleanup.
- Slice the chilled dough into thin rounds and place them on the prepared baking sheet. Bake for 10-12 minutes, enjoying the heavenly aroma wafting from your oven.
- In a microwave-safe bowl, melt the chocolate chips with the vegetable oil, stirring until silky smooth. Make sure not to overheat; you want that perfect glossy sheen!
- Dip the cooled cookies in the melted chocolate and place them on parchment paper to set, watching as they transform into delightful little gems.
Fun Ways to Customize It
Now that you’ve mastered the basic Homemade Thin Mints, why not make them your own? Here are some delicious variations to try:
- Mint Chocolate Chip: Add mini chocolate chips to the dough for an extra chocolatey crunch.
- Coffee Infusion: Mix in a tablespoon of instant coffee granules for a rich mocha flavor that pairs beautifully with the peppermint.
- Nutty Additions: Toss in chopped almonds or walnuts for a delightful nutty texture that complements the chocolatey goodness.
- Creamy Coating: Swap out semi-sweet chocolate for white chocolate and drizzle with dark chocolate for a beautiful visual contrast.
Chef Emma’s Helpful Tips
Before you start baking, here are some tips for perfect results!
- Make-Ahead Advice: The dough can be made ahead of time and frozen. Simply wrap it tightly in plastic and store it in the freezer for up to two months.
- Slicing Tricks: Use a sharp knife for clean slices, and if the dough gets too soft, chill it for a few more minutes before slicing.
- Storing Leftovers: Store any leftover cookies in an airtight container at room temperature for up to a week — if they last that long!
- Ingredient Swaps: For a dairy-free version, substitute the butter with a dairy-free alternative and use dairy-free chocolate for dipping.
What’s Inside – Nutrition Breakdown
Here’s the nutrition information per serving (1 cookie):
- Calories: 130
- Carbs: 17g
- Sugar: 10g
- Fat: 7g
- Protein: 1g
- Sodium: 20mg
Frequently Asked Questions
Can I make this ahead?
Yes! You can prepare the dough in advance and chill or freeze it until you’re ready to bake.
Can I use different ingredients?
Absolutely! Feel free to experiment with different extracts or chocolate types based on your taste preferences.
How do I store leftovers?
Keep your cookies in an airtight container at room temperature to maintain their freshness.
How long does it last?
These cookies stay fresh for about a week at room temperature, but good luck making them last that long!
Final Thoughts
Baking these Homemade Thin Mints is not just about satisfying a sweet tooth; it’s about creating memories that linger long after the last crumb is gone. Whether you share them with loved ones or enjoy them with a cozy cup of tea on a chilly evening, these cookies will bring warmth and joy to your home.
So why not save this Homemade Thin Mints recipe to your cozy baking board? It’s ready and waiting for you whenever you crave that comforting, chocolatey bliss! Happy baking!
Print
Homemade Thin Mints
- Total Time: 1 hour 27 minutes
- Yield: 24 servings 1x
- Diet: Vegetarian
Description
Delightful homemade Thin Mints infused with refreshing peppermint flavor and dipped in rich chocolate. Perfect for sharing during the Holidays.
Ingredients
- 1 cup unsalted butter, softened
- 1 cup granulated sugar
- 1 tsp peppermint extract
- 2 cups all-purpose flour
- 1/2 cup unsweetened cocoa powder
- 1/2 tsp baking powder
- 1/4 cup milk
- 1 cup semi-sweet chocolate chips
- 1 tsp vegetable oil
Instructions
- Cream together the butter and sugar until smooth. Stir in the peppermint extract.
- Mix the flour, cocoa powder, and baking powder in another bowl. Gradually add this mixture to the creamed base alternately with the milk.
- Roll the dough into a log, wrap it in plastic, and chill for at least 60 minutes.
- Preheat the oven to 350°F (175°C) and line baking sheets with parchment paper.
- Slice the chilled dough into thin rounds and place them on the prepared baking sheet. Bake for 10-12 minutes.
- Melt the chocolate chips with the vegetable oil in a microwave-safe bowl until smooth.
- Dip the cooled cookies in the melted chocolate and place them on parchment paper to set.
Notes
Dough can be made ahead of time and frozen. For a dairy-free version, substitute butter and use dairy-free chocolate.
- Prep Time: 15 minutes
- Cook Time: 12 minutes
- Category: Dessert
- Method: Baking
- Cuisine: American
Nutrition
- Serving Size: 1 cookie
- Calories: 130
- Sugar: 10g
- Sodium: 20mg
- Fat: 7g
- Saturated Fat: 4g
- Unsaturated Fat: 3g
- Trans Fat: 0g
- Carbohydrates: 17g
- Fiber: 1g
- Protein: 1g
- Cholesterol: 30mg